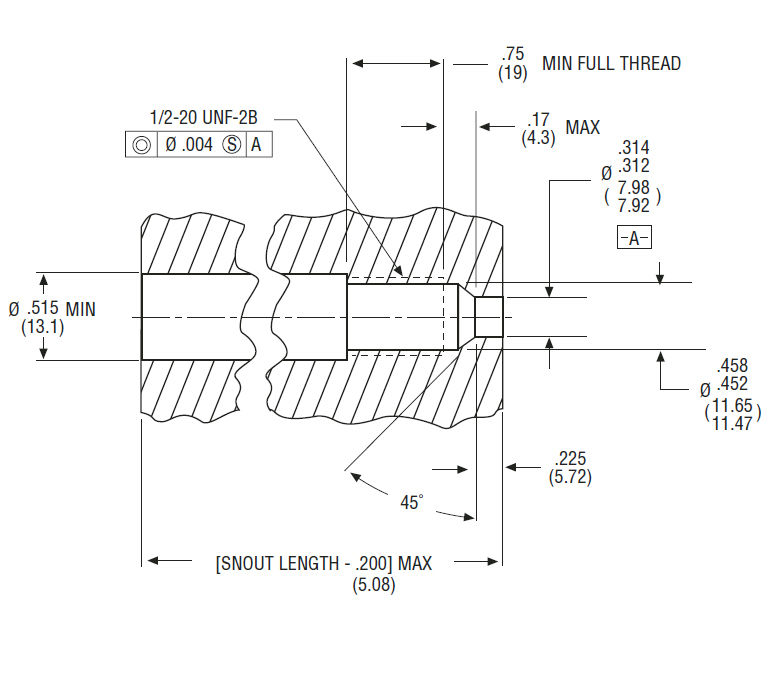
Transducer Mounting Hole Cleaning Tool Kit
The cleaning tool kit was designed by Dynisco for use in removing excess plastic from mounting holes for pressure and temperature transducers. Installation of transducers into improperly cleaned or sized holes is one of the major causes of damage to these instruments. With this kit, the .312" tip diameter hole, the 45 degree seating surface, and the .451 " hole can be cleaned. The kit includes a gauging plug which is used to verify that the hole has been correctly machined and cleaned. M 10 and M 18 cleaning kits also available.
Suggested Procedure Step 1: Clean threads of hole with four - fluted bottoming tap until threads are clean. Step 2: Thread the guide sleeve/cleaning drill into the hole. Finger tight is sufficient. In a clockwise motion, push and turn cleaning drill so that the residue is scraped from critical surfaces. Do not rock tool back and forth. Remove tool and clean off residue. Reinsert tool and scrape again. Continue this operation until tool is clean when removed. Step 3: Apply Dykem blueing on gauge plug surfaces below thread. Insert the gauge plug into the hole and rotate until surface binding is encountered. Remove and inspect. Blueing should only be scraped off 45 degree sealing chamfer. If blueing is removed from other surfaces, then mounting hole is not clean or has not been machined properly.

Transducer Mounting Hole Cleaning Tool Kit

Transducer Mounting Hole Cleaning Tool Kit

Transducer Mounting Hole Cleaning Tool Kit

Transducer Mounting Hole Cleaning Tool Kit

Transducer Mounting Hole Cleaning Tool Kit

Transducer Mounting Hole Cleaning Tool Kit

Transducer Mounting Hole Cleaning Tool Kit
Suggested procedure
|
Step 1:
Clean threads of hole with four - fluted bottoming tap until threads are clean. |
|
|
Step 2:
Thread the guide sleeve/cleaning drill into the hole. Finger tight is sufficient. In a clockwise motion, push and turn cleaning drill so that the residue is scraped from critical surfaces. Do not rock tool back and forth. Remove tool and clean off residue. Reinsert tool and scrape again. Continue this operation until tool is clean when removed. |
|
| Step 3: Apply Dykem blueing on gauge plug surfaces below thread. Insert the gauge plug into the hole and rotate until surface binding is encountered. Remove and inspect. Blueing should only be scraped off 45 degree sealing chamfer. If blueing is removed from other surfaces, then mounting hole is not clean or has not been machined properly. |
|
| Important: The cleaning tool must be used when the polymer is in a semi - molten state. Care must be taken not to exceed a torque rating of 100 inch - pounds during scraping so as not to damage the cutting edges of the tool. These cutting edges are manufactured from hardened tool steel and will not wear if reasonable care is exercised. It is strongly recommended that a high temperature lubricant be applied to the tap and the threads of the guide sleeve and gauge plug to prevent seizing. |