Transducer Mounting Hole Machining Tool Kit
The tool set for making holes and threads for melt pressure sensors includes all the necessary drills and taps to prepare a standard 1/2 20 UNF sensor mounting hole. The set contains a special pilot drill, which is needed to machine the saddle by 45 °. All tools included in this set are made of high quality tool steel. When manufacturing the thread, care must be taken to ensure precise drilling speed, lubrication and perfect concentration. Furthermore, before mounting the sensor, we recommend checking the thread, which is the color used to apply the test tip. After the test, the paint may be damaged
(scratched) only on bevel and bearing surface 45 °. If it is damaged in other places, it means that the thread was not made correctly. If you have any questions, do not hesitate to contact us. M10 and M18 kits also available.


Suggested Procedure
|
Step 1:
Drill a hole with the 9/32" drill.
|
|
|
Step 2:
Ream the hole with the 5/16" reamer.
|
|
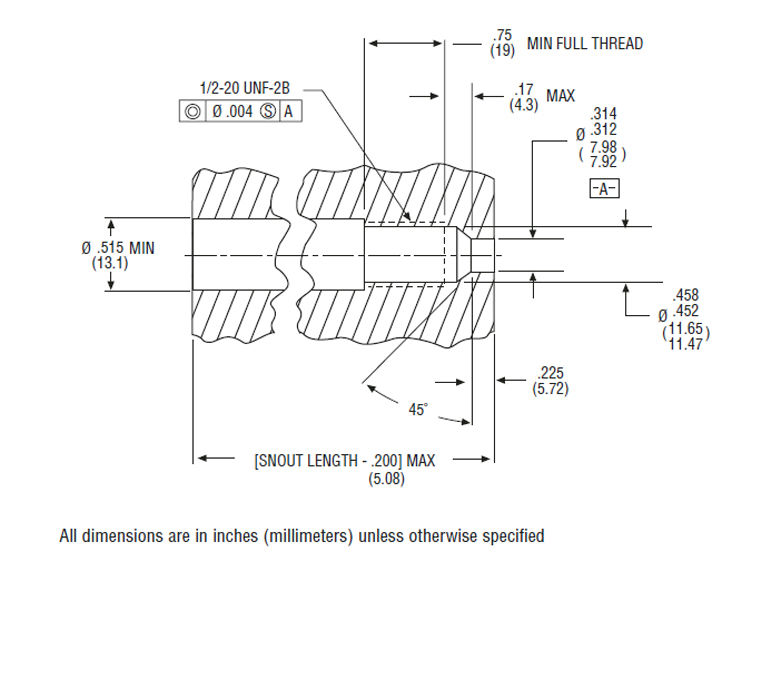
| Step 3: Consult the mounting hole drawing and calculate the depth required for the .451/.458" hole to leave .225" minimum length of the 5/16" (.312") diameter hole. Using the special 29/64" pilot drill, drill to the depth calculated above, perhaps leaving a little excess to be removed in step 7. |
|
|
Step 4: |
|
|
Step 5: |
|
|
Step 6: |
|
| Step 7: Examine the seating surface of the mounting hole. If it has been marked by the tapping operation, touch it up with the pilot drill. |